Friday, September 7, 2012

Creepy spider web!


I made a creepy Spider web I love how it turned out. A big thanks going to Redberry Barn for the inspiration. Here is a link to her page and what she did. I did not read the tutorial I just looked at the picture. It may have been easier if I did it more like hers, but it was super easy the way I did it as well. I just took a black from I had that was not being used and I sprayed it with some leftover paint from last year. I barely had enough to cover it. I wanted it to be a light coat anyway so a little black would show through I think it adds to the look. I cut the burlap then hand stitched the orange on. I used a black marker and drew/traced a spider web on. It was hard to see unless you held it in the light just right which means when I was done you would not be able to see it The black marker that is. Then I typed up the sign "Creepy spider web for rent" and printed it out Horizontally on paper. I did glue the Burlap to the glass and the paper to the inside of the frame. Then I felt like it still needed a little something and I remembered that I had Spiders left over from last year and I added them, using string on one of them to look like webbing. I love the final Product.

A few close ups

Happy Halloween

Tuesday, April 24, 2012

Popsicles

POPSICLES!!

We made some Popsicles yesterday.  It was the perfect day to make them. In the mid 80's after running in the sprinkler they tasted so Yummy!
Here's what you need:
About 2 cups Soda or Juice
Popsicle sticks
silicone baking cups
A little tin foil

Here's how you do. Lay out your silicone baking cups.
My mom got me these a few years ago. Because she knows how much I Love patriotic stuff! I use them for all kinds of things Thanks mom.

Pour your soda or Juice into the baking cups
We chose Pineapple Soda it is super Yummy
Lay some Tin foil over top. I think this step may be optional I am going to try it without doing
this and see how it goes
Put your Popsicles in the soda through the foil. I used the tin foil hoping it would help keep the sticks straight but I don't think it helped that much. They were still crooked but the kids did not mind at all. Next Place them in the freezer for at least 2 hours.  Now go run in the sprinkler or ride your bike or anything just go outside and enjoy the sun.
Tada!! They are ready to eat
See how crooked the Popsicle stick is.... See how upset he is. NOT he loved them. As did Gracie.
Well I hope yall enjoy this treat all summer long it is easy and Fun for kids all ages. Moms and Dads too.

Friday, April 6, 2012

Egg matching and Egg Lunch

Egg matching.
I have seen a ton of fun Easter games. I have not left my kids out of the fun. This was the first one we played this year. We played many others but since I suck at blogging you probably wont hear about them. But maybe.... So this is Egg matching. I had some little candies they are character shaped they actually came in eggs the shapes are Dora, Diego and Spongebob. I actually bought these eggs at the end of last year and did not hid them very well so I had to come up with some stuff for the kids to play with them. Anyway I took the candies and separated them by character and color. Then I took 2 of each kind there just happened to be 12  I put one of each kind of candy under the bottom of the egg and one under each top. Then the kids had to find the matches.
Ryder found the first one and had the candy gone as soon as I started to
say yes you can eat the candy.

Then Gracie found the next match and the next one and the next one. I actually had to tell her even though she got a match again it was Ryders turn that was after 5 matches in a row.
In the back you can see my sorted candy piles.

The game set up again

These were Gracies matches. Yes 10 I think she won. 

Then I just put the candies in the Eggs and the Eggs in the
 Egg carton and put it away for another time to play

This is going to be a double post since both of these are kind of short.
Egg Lunch
While on Pinterest. I found this
pin and fell in love with it. I is over at Brandyscraftblog. Here is here page. I looked a little but it looks like here kids are lucky to have a super fun mom! She filled the eggs with their lunch hid the Eggs so they could find their lunch and eat it.
So I thought I would do the same Although I did not hid the eggs we just went to the park and had a picnic. But the kids still enjoyed it.
The day before I let the kids paint a empty Egg Carton

I filled the Eggs with favorite lunch treats. Pretzels, Brownies Carrots Broccoli( they LOVE broccoli) and PB&J  sandwiches. Note I did have to cut the sandwiches in 8 pieces to get them to fit.

Gracies Lunch

Ryders Lunch.

I hope you enjoy reading my post. Happy Easter.

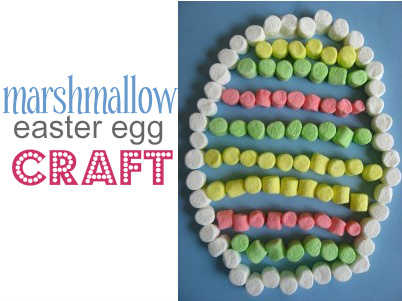
Marshmallow Easter Egg Craft

Easter Marshmallow Craft

So the kids and I did a fun little Easter craft.
I saw this from no time for flash cards. Here is their page.
and thought we have to do this
Then I saw this and thought that sure is cute!
Easter-Colouring-Page
Here is her page

So here is what I did I printed this picture and used some white out and made the Egg plain. Then copied it.  So I had 2 one for each child.
Then the kids colored the page I told the kids not to color the egg. Gracie colored it some and Ryder got very upset with her but just like I promised him it is not a big deal.

While they were coloring I put the colored marshmallows in a small bowl one for each of them. Then we started gluing the Marshmallows at first we started by gluing one at a time but…. Gracie was really struggling and the glue was about half empty so Ryder was getting impatient with it so I just put a line of Glue wherever they wanted. Which was all over the egg.

And they completely filled them in.


I made one to kind of show them more what I was thinking
and lets be honest it was kind of fun.

Then Ryder had the idea of doing his name and of course he wanted it to be all green
so it’s a little hard to tell but it does say Ryder. 

Gracie had to do hers all pink. You know the princess.
Then we hung them up on the Fire place. I somehow lost that pic. But they look great.
was such a Fun little craft. I hope everyone tries it. Even if its not a egg.
Happy Easter!


Sunday, March 18, 2012

easter Eggs

So I am Horrible at this blog thing. But I think its because my computer is so slow it takes forever.  Well Yesterday I made these eggs
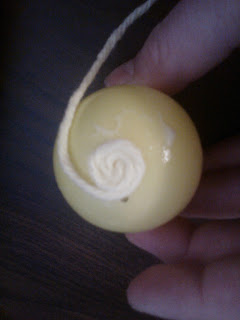
Cute Right! Well That's what a lot of people thought. I had a bunch of people ask how I made them so I thought I would make a quick tutorial about it so that why I don't have to re-explain it a bunch. First of all I want to give credit To the lady I got the idea from.  She blogs over at craftberrybush. This is the link to the page where my idea came from here. She used embroidery floss and did not give a tutorial on how she made them. Well months after I saw this I was thinking about it and decided I wanted to make them while I was at Walmart I was getting some supplies I thought she used Yarn so that is what I got but of course she did not use it but oh well it worked out great anyway. I already had all the other supplies.

What you need
Your yarn/embroidery floss or whatever you decide to use. This peaches and cream that I found was next to all the other yarn and was $1.77
Regular Elmer's school glue
Your eggs- I used plastic eggs Styrofoam and paper mache eggs so just use whatever is cheapest
Paintbrush
Scissors
small bowl to put your glue in.

Put your glue in your bowl

Using your paintbrush put a good amount of glue on the end of your egg. I started at the bottom (the bigger end) put you can start wherever

Place the yarn in the glue for the first round or two you will have to hold it down but then it gets easier for a while.

Just follow the yarn around the egg

Making sure the yarn is touching the previous row. It get a little harder when you get to the top but that just meant I pushed it down as I was going

Keep going almost done

I put a extra dab of glue right before I did the last little bit

Push down the top

Put a large amount of glue over the top and bottom

Then put glue around the whole egg and let it dry. I just let mine dry overnight. then set them out to decorate your house!!
See they were so easy. The first one took about 20 min but then the rest took about 10. I hope you enjoy them!