Sunday, March 18, 2012

easter Eggs

So I am Horrible at this blog thing. But I think its because my computer is so slow it takes forever.  Well Yesterday I made these eggs
Cute Right! Well That's what a lot of people thought. I had a bunch of people ask how I made them so I thought I would make a quick tutorial about it so that why I don't have to re-explain it a bunch. First of all I want to give credit To the lady I got the idea from.  She blogs over at craftberrybush. This is the link to the page where my idea came from here. She used embroidery floss and did not give a tutorial on how she made them. Well months after I saw this I was thinking about it and decided I wanted to make them while I was at Walmart I was getting some supplies I thought she used Yarn so that is what I got but of course she did not use it but oh well it worked out great anyway. I already had all the other supplies.

What you need
Your yarn/embroidery floss or whatever you decide to use. This peaches and cream that I found was next to all the other yarn and was $1.77
Regular Elmer's school glue
Your eggs- I used plastic eggs Styrofoam and paper mache eggs so just use whatever is cheapest
Paintbrush
Scissors
small bowl to put your glue in.

Put your glue in your bowl

Using your paintbrush put a good amount of glue on the end of your egg. I started at the bottom (the bigger end) put you can start wherever

Place the yarn in the glue for the first round or two you will have to hold it down but then it gets easier for a while.

Just follow the yarn around the egg

Making sure the yarn is touching the previous row. It get a little harder when you get to the top but that just meant I pushed it down as I was going

Keep going almost done

I put a extra dab of glue right before I did the last little bit
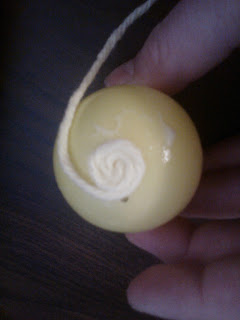
Push down the top

Put a large amount of glue over the top and bottom

Then put glue around the whole egg and let it dry. I just let mine dry overnight. then set them out to decorate your house!!
See they were so easy. The first one took about 20 min but then the rest took about 10. I hope you enjoy them!

Tuesday, November 1, 2011

Halloween treat

As a treat for all Ryder and Gracie's cousins we made some chocolate covered pretzels. They were so yummy. The kids had so much fun making them. Plus they are super easy. Here's what we did.
Melted the Chocolate
Added the pretzels. Mixed it up really good.

Laid them out on a cookie sheet.
Added sprinkles.
Let them cool/dry then put them in some baggies. Todd had these little ones from somewhere so I took them and put them to use.
We wanted to add a little extra to them. So I cut out some Halloween decorative paper and black paper. Glued them together
Had Ryder write every ones name on all 14 of them.
He did a great Job!
I taped the baggie to the paper and they were done.
While Ryder wrote the names Gracie colored.
We mailed off the ones that don't live close and hand delivered the ones to the cousins that live close.
When we mailed them off we also added all the stuff to do our little pumpkin craft it was a lot of fun. Maybe we will always do this I know kids love getting stuff in the mail.

Paintin Pumpkins!!

Of course after we picked pumpkins we had to paint them. Ryder and Gracie always paint the craziest things. Here is a few pics from pumpkin painting.
Painting the face
                                                                        How does it look
                                                                 OOPS forgot the mouth
                                                                      It got pretty intense
                                                  He did not realize he was painting over the face
                                                               All done! Looks great Buddy!
                                        I find R's everywhere. So glad he learned how to write them.
                                                             Gracie totally skipped the face
                                                                     She is a serious painter
                                                                            Almost done
Great Job Gracie!!

Pumpkin picking

Grandma Holly took the kids to pick out their Pumpkin How fun! here's a few pics
                                                Look Mom!
                             Its so heavy I am going to drop it
Ryder picked a good one!
Grandma and the Kids
                                     Todd and I with the kids
                                          Make a silly Face
 Our little Family :)


Hair Bow Holders

Hair bow Holders come in many different shapes and sizes. I made the one I use for Gracie almost 2 years ago. The house next to us was being remodeled and they took out the bathroom mirrors/medicine cabinets. They were just going to throw them away so they said we could have them. We took the cabinet part off. One of them we left as was and hung it on the wall and used it as a 2nd bathroom mirror. The other had a weird thing on it in the corner and would not come off. So I took it apart kind of like you would a frame it was not super easy but I managed. I covered it with some fabric and attached a look ribbon across the bottom and some tighter ribbon going up and down. Then I had to hot glue it back together. I was worried about it coming apart (it probably wont but just to be safe) I taped it a lot on the back. Oh i also spray painted the frame silver.

Tada I was done.
At first I hung Gracies bows and Bracelets on it but most of her bracelets are lost or to small now so it hold mostly bows. Well I have been acquiring a lot of hair ties lately and it was making a mess of the bathroom. So I decided to put the hair ties on a O ring. 


All the different kinds of hair ties we have on O rings
I left them in the bathroom for a while but it was still kinda messy. So I started putting them on her bow holder on the loose ribbon.


I love it and it works great for use and maybe you to.

Friday, October 21, 2011

My little Halloween decoration

I have been seeing so many cute little decorations for Halloween. The ones in the jar where you layer different beans and popcorn kernels and I LOVE them. Last week I was at Grandma Shirley's house and she has this Beautiful tree with these little orange berries on them.

                                                                          Here's her Tree!
Well After seeing these it hit me. I wanted to make a layered jar out of these. Awhile back I saw this Triangle shaped jar at the DI and it was like .75 so I bought it.

I had some Black beans left over from a bean bag project I did a while back. So I asked Grandma if I could have some berries. Of course she told me yes her exact words were " take as many as you would like". I made sure there were no stems left on the berries. Then I put a layer of berries on the bottom then alternated berries and Black beans until the jar was filled.

It looked like this

I added a ribbon

Then put it on my table.
I love it so Simple, Cute and Cheap. Thanks Grandma Shirley for letting me have the berries.